Thursday 28 October 2010

New Mini Kit Coming Soon to The Craftz Boutique

New Mini Kit Coming Soon... "Hot Chocolate"


Close Up of the Hanging Mittens:


~ Charlotte ~

Tuesday 26 October 2010

November Monthly Kit Sneak Peek...


Sneak Peek of Novembers Monthly Kit:


This Kit will be added very shortly and contains lots of embellisments and papers in gorgous autumnal colours!

Thank you for looking

~ Charlotte ~

Thursday 7 October 2010

New October 2010 Kits now available at The Craftz Boutique

October 2010 Monthly Kit now Online at The Craftz Boutique


This months kit features the new Fancy Pants Happy Together Collection as well as Creative Imaginations Beloved Papers. The Creative Imaginations alphabet sticker sheet is a new unique product and is included in the kit - the sheet contains a variety of different expressions/words/sayings which you can use as they are but you can use the letters seperately - all of the letters in the sayings form a whole alphabet!
I created both of the layouts below using the kit and still had papers left!


Also, I have created a mini kit this month in addition to the kit above using the Fancy Pants Lilac House Range. I created the layout below using this mini kit.


Thank you for looking

Charlotte
x

Saturday 21 August 2010

A very quick post...

I don't usually use many MME papers but their new collections are amongst my favourite new releases! I just wanted to share a quick look at a layout I created using an upcoming kit by The Craftz Boutique... Hope you enjoy!


~ Charlotte ~

x

Monday 2 August 2010

New August Monthly Kit Now Online ..... @ THE CRAFTZ BOUTIQUE

I have just finished putting the August Monthly Kit together and created the following layouts using it. The kit focused on Websters Pages - these papers are so versatile and give lovely effects! You can see the kit {here} along with the product info.
Hope you like the layouts and thanks for looking!
~ Charlotte ~


Sunday 18 July 2010

Summer Mini Kit Now Online

Aquatic Paradise
After a quiet spell doing university exams and a well deserved holiday after I am back and ready to get back to scrapping! I have created a new summer themed mini kit for the website which is now online {here} and my take on the kit can be found below. The mini kit contains Hambly, Petaloo, Prima, Creative Imaginations and Zva items and has a very summer feel - perfect for beachy pictures!


Thanks for looking!

~ Charlotte ~

Sunday 2 May 2010

Lace Flower...

Materials Needed:
  • A Length of lace depending on the size of flower wanted (We used 8")
  • Floss & Needle
  • Embellishments (Flower, Button, Brad)
1) Cut a length of lace (8")


2) Fold the lace in half. Then use the floss to sew the ends together at the top.


3) Turn the lace inside out
4) Make small running stitches all along the straight edge.


5) When you get back to where you started the running stitch, gather to pull the lace together.


6) Use embellishments to fill the centre.


Sunday 28 March 2010

We are really excited to introduce the brand new Craftz Boutique blog! We hope to bring you inspirational ideas, kits, product reviews and all of the latest news on what new items we have coming to our website and what has just been uploaded!

Just Added to the Website ... Brand New Pink Paislee

Pink Paislee - "Queen Bee"

Instructions for creating the Lily included in the April Monthly Kit:

Additional suppies needed:

  • Glue
  • A soft padded surface such as a mousemat to work on
  • Tweezers
  • A material to shade the petals such as markers or Twinkling H20's & a Waterbrush
The kit contains 6 petals each of 4 different sizes. Seperate the Petals into the four different sizes. Take one size to create your Lily.

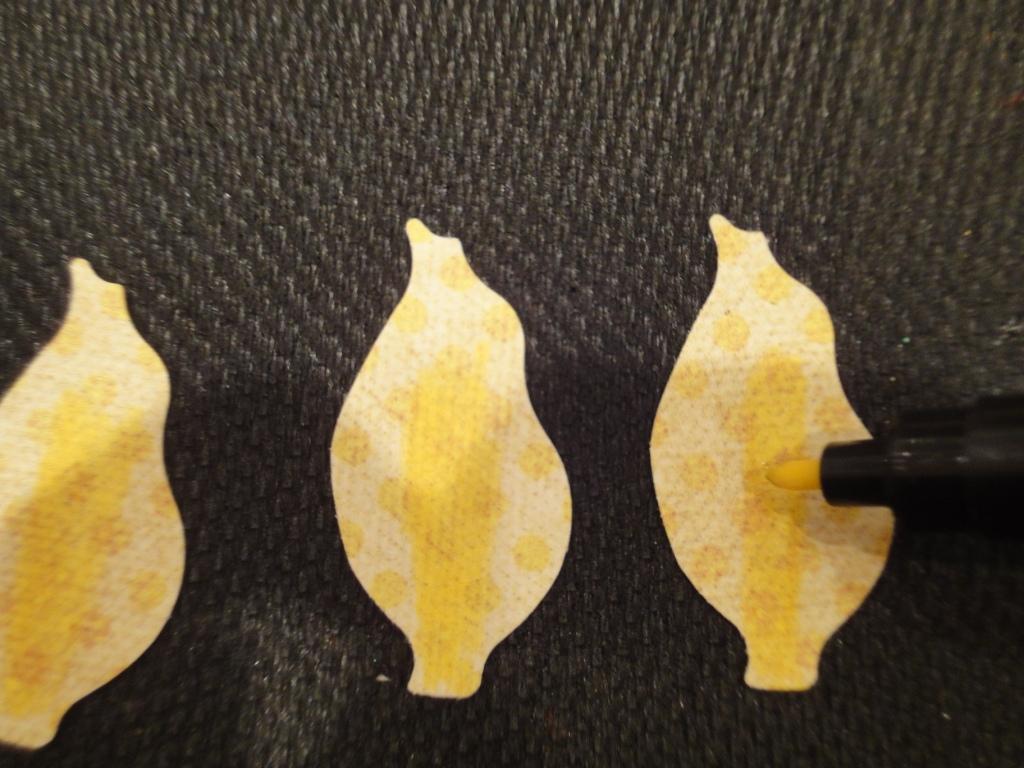
Using a marker, such a a Pro-Marker or Copic Ciao or a Waterbrush and Twinking H20's, add shading down the center of the 6 petals.

With a darker marker 'dot' over the shading.

Using the flat end of the tweezers shape the 6 petals by applying pressure & running the tweezers down the length.
Take each petal by the tip and dip each end into glue. Place 3 petals around each other projection of the green snowflake shape. Repeat with the other 3 petals placing them closer to the centre.

Take the stamen piece and colour circles on the ends on both sides.

Dab a small amount of glue in the middle and press the stamen together. Then dip the end into the glue and place it in the center of the flower.

Allow to dry completely (Approx 30 minutes)

Monday 15 March 2010

New Graphic 45 Collection - Le Romantique

We have just added the new Graphic 45 Collection - 'Le Romantique' along with 'A Proper Gentleman' and 'Boardwalk'
These collections are the first ones which we have stocked of Graphic 45 and we are really impressed with the quality and design. The papers definately have a lovely vintage feel perfect for heritage layouts. We have created the following layout using the Le Romantique Collection to give an idea of what could be acheived with these papers. In the layout we have also used Prima Marketing Tea Roses Latte and Grand Dame Ambrosia Blooms, Bazzill Tulle, Websters Lace and a Zva adhesive swirl.
The Papers used from the Le' Romantique collection are: Loves Labyrinth, Le' Romantique Paper, My Beloved, Key to My Heart, Well Groomed, Sweetheart of Mine. From the A Perfect Gentleman collection I have also used the Timely Point of view paper.

Wednesday 10 March 2010

My Minds Eye - Bella Bella

My Minds Eye 'Bella Bella'
For this layout we used the Bella Bella Range by My Minds Eye and the Bo Bunny Snowy Serenade Prelude Die Cut Glitter Paper as a template for the shaped paper.


For this layout we used the following items available from our store;

(Click on the items to view)
-
My Mind's Eye Bella Bella Papers and Accessory Die Cut Sheet
-
Melissa Frances Pink Ribbon Collection
-
Prima Marketing Mini Roses Fuchsia
-
Zva Creative Flourish Pearl I Lavendar Pink
-
Mark Richards 3mm Adhesive Pearls
- Prima Marketing Winter Roses Cherry Frost